OpenPetra Developer's Assistant
Summary
The OpenPetra Developer’s Assistant (OPDA) provides a traditional Windows GUI onto all the command line driven tasks associated with OpenPetra software development. Although the program should be largely intuitive, this document describes the features of the application and how you might use it. You can run individual tasks or set up sequences of tasks that can be run one after the other.
Installation
The application is a single file .NET v4.0 executable so needs no special installation. You can run it from any location. It will create its own settings file in the user’s personal local data folder (usually hidden). The installer can be found here.
History
Read about improvements made for Version 1.0.6.0 here.
Read about improvements made for Version 1.0.5.0 here.
The GUI
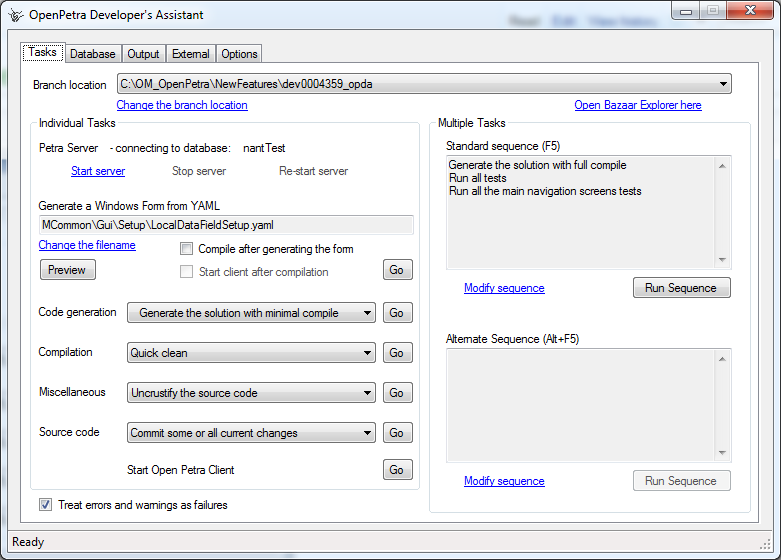
The screenshot below shows the main window.
The window has five tabs. Most of your time will be spent in the Tasks tab. The Database tab has functionality that is directly to do with setting up the database that you want to use. The Output tab shows the result from running the task or sequence of tasks. The Options tab is where you can change a few settings that alter the Assistant’s behaviour. The External tab has web links to useful OpenPetra sites such as this wiki or database design screens.
The first time that you use the Assistant you will need to create a new branch or set the Branch Location. The branch location is the disk folder where you are working to develop OpenPetra. Click on the Change the branch location link and set the folder that is applicable for you. The Assistant will remember this location every time you run the application until you change it again using the same link. The Assistant will check that you have selected a folder that contains the OpenPetra project files. Once you have selected a valid location the other options become available to you. If you keep all your branches beneath a common folder, you will find that all your branches are listed in the Open Folder dialog.
The Tasks tab screen is divided into two parts. You can run an individual task or you can set up one or two sequences of tasks that can be executed as a group.
Running an Individual Task
The left hand side of the screen provides a select-and-click interface to run most of the tasks that are otherwise available from the command line. These include
- Generating a Windows Form from YAML, optionally compiling the new code and starting the client
- Generating the complete solution, optionally with three levels of compile
- Generating the Object-Relational Model (ORM) code, the glue code and the code for the cached tables
- Cleaning and compiling the entire code or individual solutions within it
- Initialising configuration files
- Starting, stopping or re-starting the server
- Starting the client
- Dealing with source code management both locally and on 'Launchpad'.
These tasks are grouped into categories. For each category you select a task. You run a category task by clicking the appropriate Go button. Most tasks are executed by 'Nant' - our method for performing build actions. Source code tasks use your installation of Bazaar. If you are running a 'Nant' task you cannot start another one until that finishes. However you can run a Bazaar task alongside a Nant one. Similarly, you cannot run two Bazaar tasks together unless at least one of them is a non-blocking task. This is explained in more detail below.
If the Nant task runs successfully with no errors or warnings, the Assistant takes no further action. However, if there are errors or warnings the Assistant displays a yellow banner message in the status bar at the bottom of the screen. When you activate the Output tab you can view the complete output from the task action. You can choose whether to view concise or verbose output using the checkbox. If there are warnings or errors, you can view each one in turn by clicking the Prev and Next buttons – but only when the verbose output is displayed.
If the task generates an error, you should find the cause of the error near the bottom of the text in the Output tab.
Of course, even if the task completes successfully you can still view the output by selecting the Output tab.
Running a Bazaar Source Code Task
If your OpenPetra code is hosted by Bazaar you can make use of the capabilities available on the Source Code combo box. The available actions should be self-explanatory. The majority of the actions are blocking actions but they run asynchronously. If an asynchronous Bazaar action is in progress you cannot start another blocking action but you can start a non-blocking action at any time. Non-blocking actions are: view history, view changes, browse and resolve conflicts.
Running a Sequence of Tasks
You can construct two sequences of tasks that can be run as a single task. The Standard Sequence can be run by clicking the button or by pressing F5. The Alternate Sequence can be run by pressing its associated button or by keying Alt+F5. Once again the Output tab will be automatically activated if there are any errors or warnings in any of the tasks. If there is an error the sequence will be aborted.
Constructing a Sequence
Click the Modify Sequence link to create or change a sequence. You can add, insert, change the order of, or remove tasks in the sequence. Source code tasks cannot be included in a sequence.
Starting, Stopping and Restarting the Server
The Assistant is ‘smart’ about the server. The Assistant is aware of the server state and will only start the server if it is not already running. When it stops the server it also closes the command window that was hosting it. You can open other command windows either before or after launching the server and they will all be unaffected. The Assistant can stop an instance of the server even if it was not started from the GUI. So you are strongly advised to manage the server using the Developer’s Assistant GUI. In fact the default behaviour is for the Assistant to manage the server automatically. If you start the OpenPetra client when the server is not running, the Assistant will automatically start it for you. Equally, if you attempt to compile the server solution or generate the complete solution with full compile, the Assistant will automatically stop the server first. This default behaviour can be altered using the options on the Options tab.
The ability to re-start the server is useful in the following situation in particular. If you are testing adding data to the database you will sometimes use a database editor application like SQL Expert Personal or the Firefox add-in to remove the data you just added so you can test further changes to your code. If you are dealing with a cached table you will need to re-start the server to propagate the deletions through to the cache.
The Database Tab
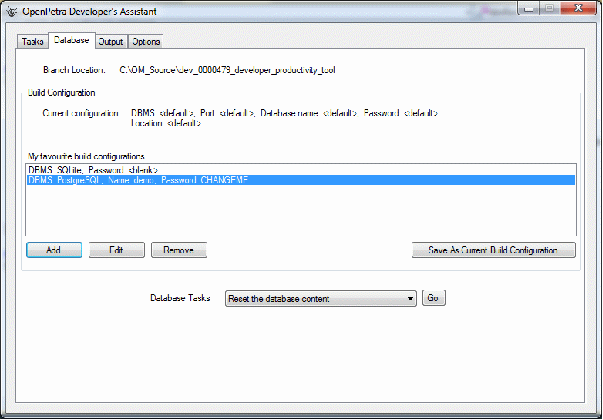
The Database tab has options that allow you to develop your code against the different databases which OpenPetra supports. The screenshot on the next page shows the Database tab. At the top is a reminder of your current working branch. Beneath that is a panel that shows the current database configuration including the DBMS type (SQLite, PostgreSQL or MySQL). The full list of ‘options’ is
- DBMS type
- DBMS name
- Password
- Port
- The server or file location depending on the DBMS type selected
Your current database configuration is stored in a file that the Assistant will create for you if you have not done so already.
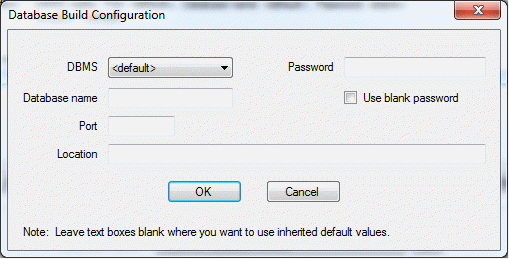
The Developer’s Assistant allows you to save any number of ‘favourite’ configurations which you can apply to your current setup. Use the Add, Edit and Remove buttons to manage your favourites. You do not have to set values for each option. If you leave an option blank OpenPetra will use its default value. Notice that you can explicitly select to use a blank password. If you leave the password box blank and do not check the box OpenPetra will use its default password.
Also on this page are the Tasks that relate to databases, including resetting the content or recreating the entire database.
The Links Tab
The Links tab provides a useful central location for remembering and accessing useful web links that are relevant to OpenPetra. A number of links are provided to get you started but you can edit the list in a standard text editor using the link provided. To browse to the web page that you select you just click the Browse button.
The Options Tab
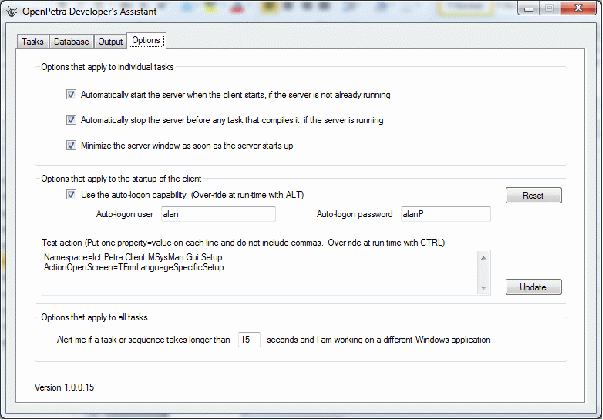
The Options tab has two sets of options. The screenshot is on the following page.
The first group are options that apply only to the Individual tasks panel on the Tasks page. These are the options that control the automatic management of the server.
The second group of options affect the start-up of the client. You can speed up the development process by selecting options that bypass the log-in screen and / or that open a specific client screen without having to go through the menu structure. These options are described in the wiki and can be bypassed at run-time so that normal behaviour is restored.
If you choose to automate the login, you must supply a username and password. If you choose to activate a specific screen you must supply some start-up information and set any necessary properties. The wiki describes how to supply a comma separated string of property=value pairs. The Developer’s Assistant requires you to put each pair on a new line without the commas. The Assistant will format your string accordingly (see the screenshot below).
The Update button will apply your settings to your personal client configuration. If you do not have a personal client configuration file the Assistant will create one for you.
The Reset button not only resets your settings to default values but actually overwrites your personal configuration file with the latest file from the repository. This is useful if you have done a merge with trunk and new features have been added to the client configuration file.
If a task takes a long time to execute (such as generating the complete solution) the Assistant will flash the program icon in the Windows Taskbar when it has finished, if you have started to use a different Windows application. The default setting is that this alert will not happen unless a task takes at least 15 seconds to complete.
Uncrustifying Your Code
One of the miscellaneous options is to ‘uncrustify’ your code. For this to work, you must have installed the Uncrustify application in your 32-bit Program Files folder in a subfolder named Uncrustify. That is to say that the path to uncrustify must be
…Program Files\Uncrustify\Uncrustify.exe
or
…Program Files (x86)\Uncrustify\Uncrustify.exe
If you have it installed somewhere else, see the wiki for how to set a property in your build configuration file.
When you choose this option the Assistant will pop up a browse for folder dialog. All the source files in the selected folder and its sub-folders will be beautified.
Using the Developer’s Assistant
Here are some tips for getting the most from the Developer’s Assistant.
The tasks that involve compiling an individual solution such as the server or client use MSBuild and not SharpDevelop. If you want to run these tasks you must follow all the steps in the OpenPetra wiki relating to set up Nant. In particular be sure to perform the step involving NantContrib. Additionally, if you use both SharpDevelop and the Developer’s Assistant to compile your work, be aware that while both MSBuild and SharpDevelop only compile code that has changed since the last compile, they keep track of these changes independently, so even though the compilation is up to date in one environment the other may still need to compile files again.
The Developer’s Assistant is good for showing up warnings that are generated during compilation because it captures all the output from the build process, but unfortunately you cannot click straight from the warning to the code that it refers to. However it is interesting to note that the Developer’s Assistant can show up warnings that SharpDevelop may not detect and vice versa, so it is worth using both techniques to verify your code.
Using the Developer’s Assistant from the command line
From version 1.0.1.20 you can execute two commands using a command line interface. The command line switches are: /s to start the server and /x to stop the server. These commands are useful when working in the development IDE of Sharp Develop or Visual Studio.
When you are developing code that needs to rebuild shared client/server files, the build will fail if the server is already running because it cannot copy the new DLL's since they are already in use. By creating a pre-build action on the first project to be built (usually Ict.Common), you can force the IDE to close the server before it starts compilation. Then you could add a post-build action on the PetraClient project to start the server again after a successful build, before clicking the 'Start Debugging' action.
The best way of achieving this is to create an environment variable called, say, OPDA_PATH and set its value to the full path to the Assistant (something like 'Users\Me\Desktop\Ict.Tools.DevelopersAssistant.exe'). Then your pre- and post-build actions are simply
%OPDA_PATH% /x
and
%OPDA_PATH% /s
Example of developing server code
If you are working on server code, you may well find it useful to set up a sequence such as this
- Stop server, if it is running
- Quick compile the server solution
- Start server, if it is not running
- Start client
Then when the code is not behaving exactly as you wish
- Edit the server code in your development environment
- Switch to the Developer’s Assistant and press F5
- Test your changes
Example of developing a Table Screen in the Client
In this example you will be working in Notepad++ to edit the YAML. You are trying to get the layout of the screen as you want it. The C# code behind is working. In this case set up this sequence.
- Generate Windows Form from YAML
- Quick compile client solution
- Start the server if it is not running
- Start the client
Once again, edit the YAML file, switch to the Developer’s Assistant and press F5.
Example of developing Client C# code
In this example you will edit the C# code in SharpDevelop, say, where you might also compile it to be sure that syntax errors are removed, then switch to the Developer’s Assistant and simply click the Start Client button. This will start the server if it is not running (assuming the default option settings) and then start the client. In this case there is no need for a special sequence.
Comments and Suggestions
If you have any thoughts on how the application could be improved, or if you think there is a vital Nant task missing, please let Alan know at alan.paterson at om.org.


