How to work with bazaar through the GUI on Windows
Alternative: use Bazaar from the command line
If the GUI is not your prefered way of doing things, please see How to work with bazaar on the command line
Download Bazaar for Windows
You find the downloads for Bazaar for Windows here: http://wiki.bazaar.canonical.com/WindowsDownloads
We currently recommend to use the Standalone 2.2 Stable Release. This includes the core Bazaar distribution and several GUIs for Bazaar.
We have noticed that the german translation is not complete at all, and on German Windows systems the GUI is quite mixed up with several languages. Solution: delete all but the en locale directory from C:\Program Files\Bazaar\locale. If the local-folder is not available on your computer you can also set the LANG environment variable to the required language code.
See also Visual Tour of Bazaar Explorer on Windows.
Resolve plink annoyances
If you get annoyed by all the plink console windows: It seems, Bazaar is still using the default Putty version of plink, which always shows a console window. TortoiseSVN eg. uses TortoisePLink.exe, which is a modified version of plink, that runs invisibly, without a console window. It does not seem to work to replace the putty plink.exe with the TortoisePLink.exe.
The solution is to use paramiko, a python tool that deals with SSH connections. It seems there is the suggestion to make paramiko the default instead of plink.exe (see https://bugs.launchpad.net/bzr/+bug/414743).
To install paramiko now, using instructions from http://www.andreas-schlapsi.com/2008/03/29/using-bazaar-and-launchpad-on-windows/:
- Download and install the 2.7.1 release (32-bit) of Python for Windows: http://www.python.org/download/releases/2.7.1/
- Don't download and install the 2.7.1 64-bit release as pycrypto won't work with it.
- If you have a newer version of Python installed on your computer you still need to install 2.7.1 as pycrypto only works against this particular version!
- Download and install pycrypto: http://www.voidspace.org.uk/python/modules.shtml#pycrypto
- Download the zip file http://www.lag.net/paramiko/
- Unzip and run on the command line:
cd paramiko-1.7.4
c:\python27\python.exe setup.py install
- Now remove the variable BZR_SSH from the environment variables in case you have it set.
After following those steps you won't get the plink console windows anymore when doing any bazaar operation.
Setup your environment
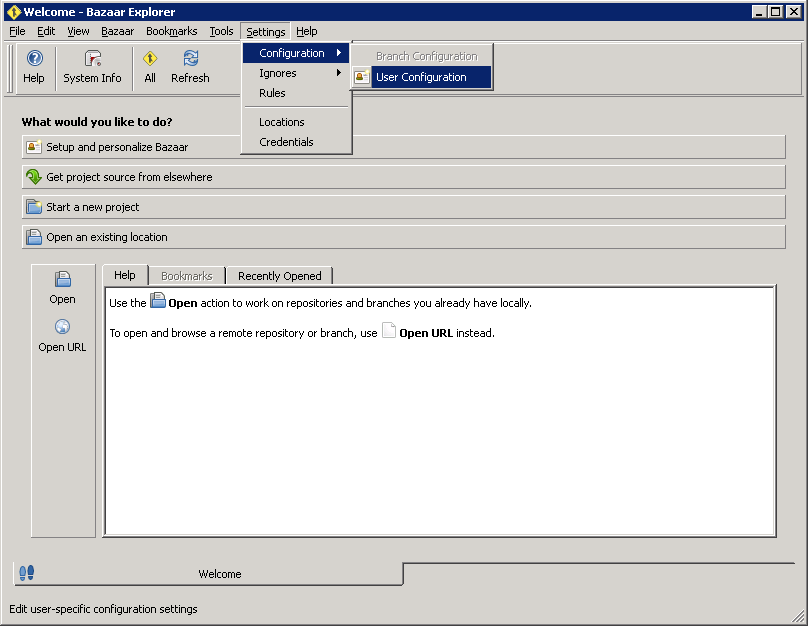
Start Bazaar Explorer from the Start menu.
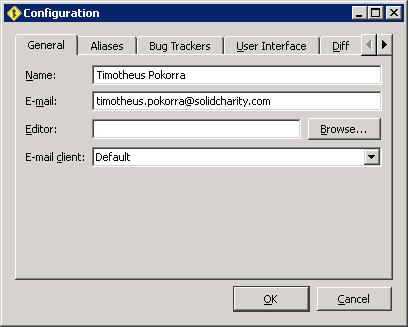
Go to Settings|Configuration|User Configuration to set your user name and email address:
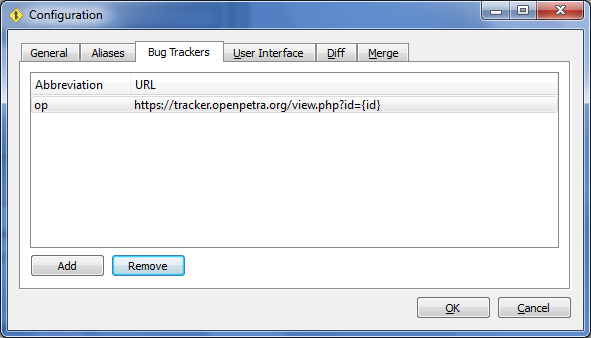
Set up the bug tracker integration as follows:
Here is the URL for easy copy&paste: http://sourceforge.net/apps/mantisbt/openpetraorg/view.php?id={id}
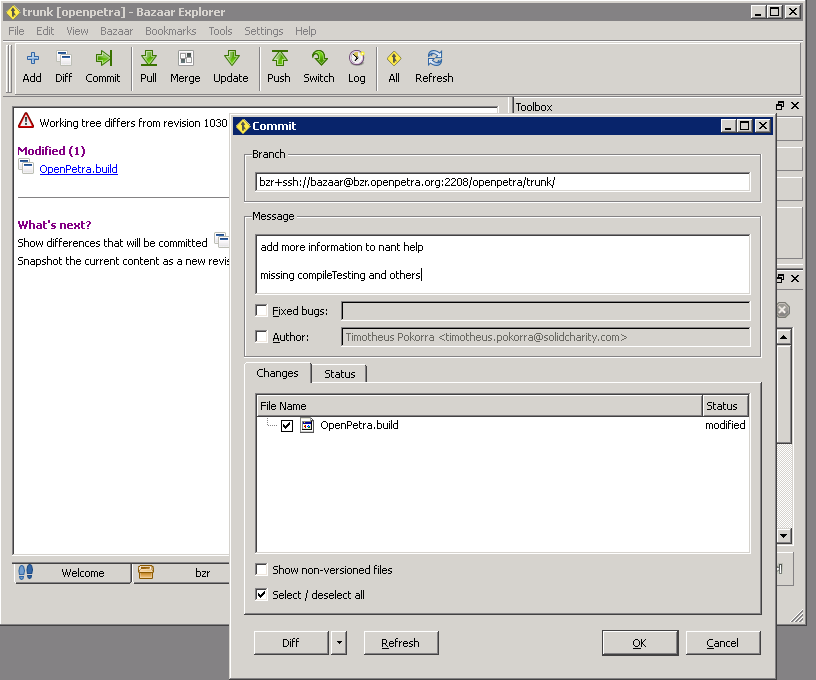
The commit dialogue of Bazaar Explorer allows one to specify a bug that was closed with the commit. One needs to prefix the bug number with 'op:' (e.g. 'op:170' if Bug #170 is closed in the openPETRA bug tracker).
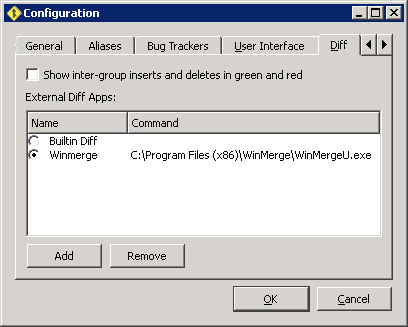
If you prefer to use WinMerge for showing the diff of files, you can configure it in the same window as well:
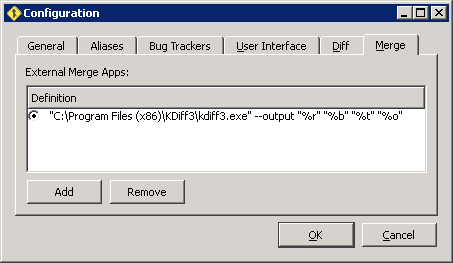
To setup KDiff3 (http://kdiff3.sourceforge.net/) as your Merge tool, configure it in the same window:
For Copy&Paste: "C:\Program Files (x86)\KDiff3\kdiff3.exe" --output "%r" "%b" "%t" "%o"
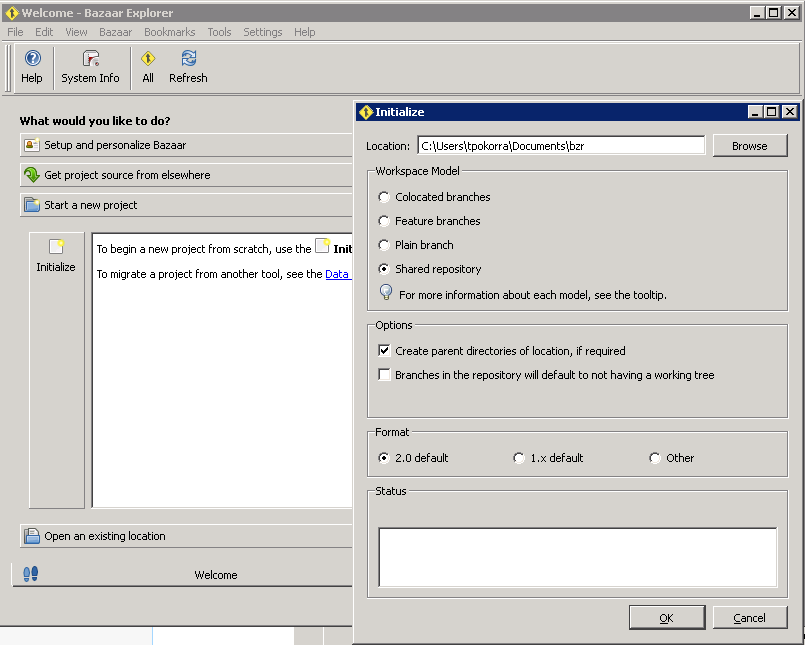
Now you should configure a directory where you will store all your branches. Go to "Start a new project", and click on "Initialize". Make sure to select the options "Shared repository" and "Branches in the repository will default to not having a working tree".
I have chosen the directory <My Documents>/openpetra/bzr/
You might be asked, if you want to create a new "hat". Just say yes. An explanation can be found here: http://wiki.bazaar.canonical.com/BzrExplorer#hats
Line Ending issues
To avoid problems with the line endings, and the code generators, in Bazaar Explorer go to Settings/Rules and insert the content listed at How_to_work_with_bazaar_on_the_command_line#Line_Ending_issues
See also http://doc.bazaar.canonical.com/development/en/user-reference/eol-help.html
Working with trunk and branches in Bazaar
trunk is the main branch of the repository. Only members of the core development team can commit to trunk and merge changes from a branch into trunk.
For other developers it still might make sense to checkout trunk, for readonly access, and to compile the latest version from the repository.
For the core developers, that have write access to trunk, we have agreed to create an extra branch for each bug or feature from Mantis, that takes more than 3 hours to develop, including the time needed for coding and testing. Only small bugs and not so complicated fixes can be committed directly into trunk.
There are several options how the local repository looks like. With a shared repository as described above in the setup of the working environment, you can check out several branches (and trunk which is just a special branch) into separate working trees. This can be useful when you are working on several topics or bugs in parallel.
One way of dealing with a working tree, as is described in the following section, is to have just one working tree, and switch that working tree between trunk and branches. This saves space on the harddisk, and saves as well time for recompiling the code etc each time you switch the branch.
For creating a new branch, this is not possible in the initial checkout in the GUI. You can:
- either use the command line (see How to work with bazaar on the command line#Branches) to create the branch, and then checkout the branch as described in the next section Create a working branch
- or you first do a checkout of trunk (as described in the next section Checkout a branch into a working tree) and then switch to a new branch, that will be automatically created on the server (see below How to switch a working branch).
Checkout a branch into a working tree
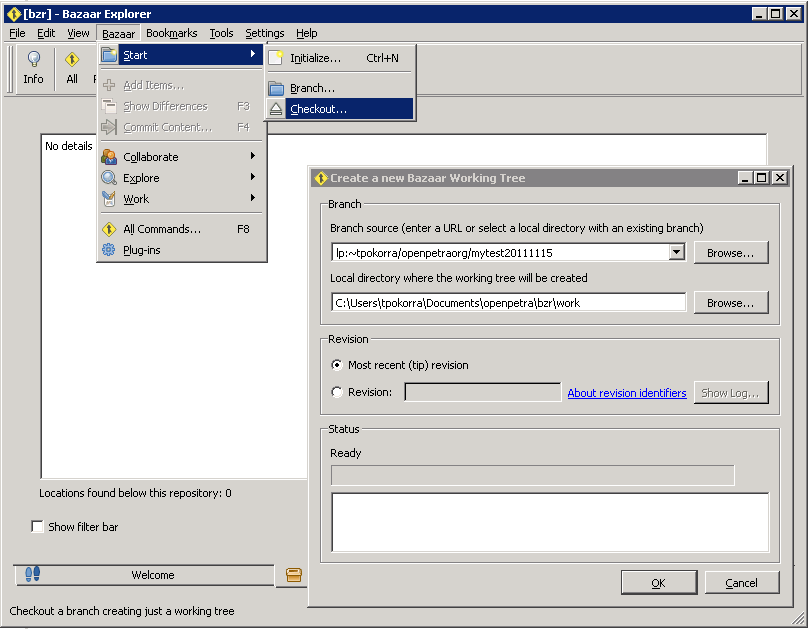
You can download the trunk or any other branch into your own directory, by selecting in the menu Bazaar | Start | Checkout.
As a developer with ssh permissions for the repository, use this source URL:
bzr+ssh://bazaar@bzr.openpetra.org:2208/openpetra/trunk
Important for developers with ssh permissions: make sure you have started pageant with your private key, otherwise your connection to the bazaar server will fail. To do that, you just need to double-click on the .ppk file, which is the private key file which you saved when you created the SSH key for developer access.
For anonymous access, use
http://bzr.openpetra.org:8008/openpetra/trunk
If you'll copy and paste the those lines, be careful and avoid a space at the last positon. "...openpetra/trunk" is different of "...openpetra/trunk "!
For just browsing the source online, go to
http://code.openpetra.org
The destination for the checked out trunk would be in my case:
<My Documents>/openpetra/bzr/work
I chose the name work for the directory name, because this way it is not so confusing when I use the same directory to switch between trunk and my branches for development.
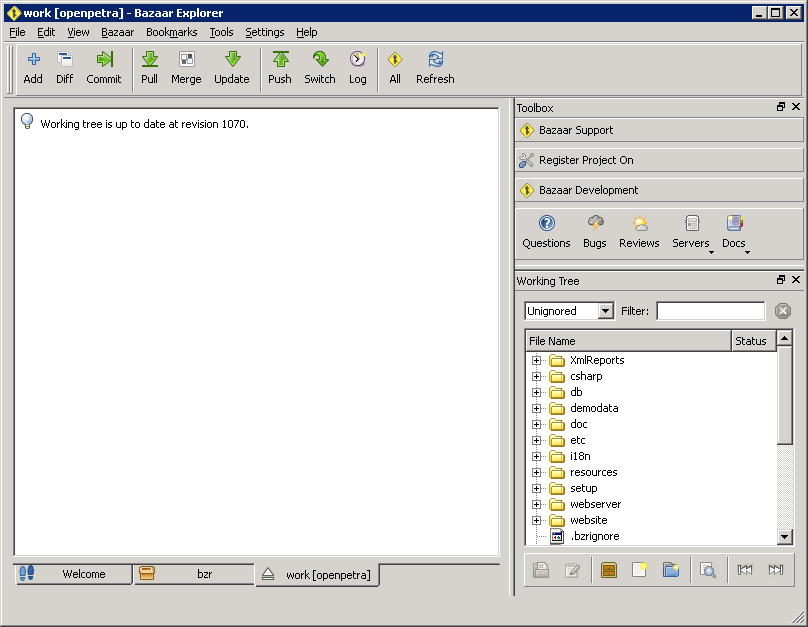
After the checkout has finished, click on Refresh in the Bazaar Explorer, and then double-click trunk to get to the view of the current working tree:
How to switch a working branch
Make sure you have checked out a working tree (Checkout a branch into a working tree), otherwise the following instructions make no sense.
For a development/feature branch, you need to use the 'Switch' command.
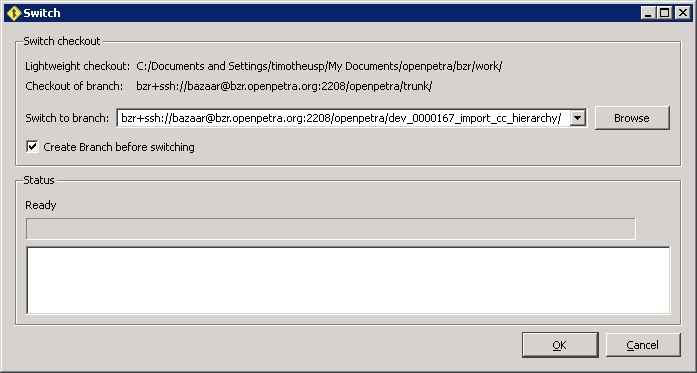
- Click the 'Switch' Button in the ToolBar.
- Make sure you tick the box "Create Branch before Switching".
- You need to specify the name of the branch on the bazaar server.
In this example it is: bzr+ssh://bazaar@bzr.openpetra.org:2208/openpetra/dev_0000167_import_cc_hierarchy/
In the end, your code will still be in My Documents\openpetra\bzr\trunk, but if you commit, it will always be against bzr+ssh://bazaar@bzr.openpetra.org:2208/openpetra/dev_0000167_import_cc_hierarchy/, and the title of the Bazaar Explorer window also contains the name of the branch you are working with.
To get an overview of all the existing Branches of openpetra go to this website.
Commit added and modified files
The Bazaar Explorer should look similar to this for your working tree:
This screen gives you access to operations like:
- Add: add new files
- Rename: rename files in the working tree control
- Commit: commit local changes to the repository
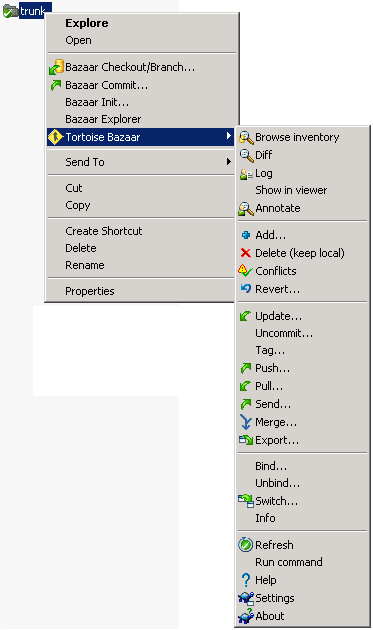
Alternatively, you can work with Tortoise Bazaar as well:
Rebase a branch
You should rebase your branch regularly, so that the changes happening in trunk are flowing back into your branch.
You need to click on Merge, and if there have been changes merged into your branch, you will need to Commit as well.
It is highly recommended to first commit all your own local changes, before doing a merge.
Merge to trunk
You need to switch to trunk, and then do a Merge from the branch. Resolve conflicts if there are any, and do a Commit.
Resolve conflicts
This example will show you how to resolve a conflict.
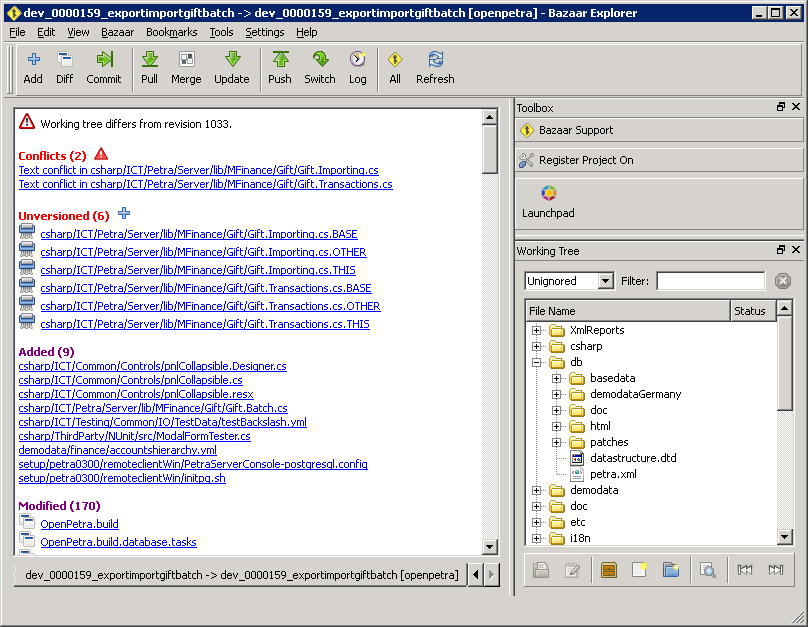
The situation: the file Gift.Importing.cs has been edited both in trunk and in the dev branch. We switch to the dev branch, and select Merge from bzr+ssh://bazaar@bzr.openpetra.org:2208/openpetra/trunk/
This is how it looks in Bazaar Explorer:
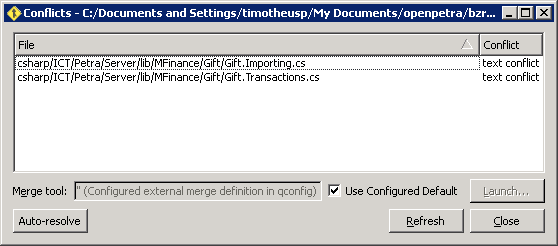
Now go in the menu to Bazaar > Work > Resolve Conflicts. You will get this screen:
If you have configured KDiff3 right, you should be able to double-click the conflict files and see them in KDiff3. This only works for files that have text conflicts. For files with content conflicts, you need to manually compare the .BASE and .THIS or .OTHER file with the current file.
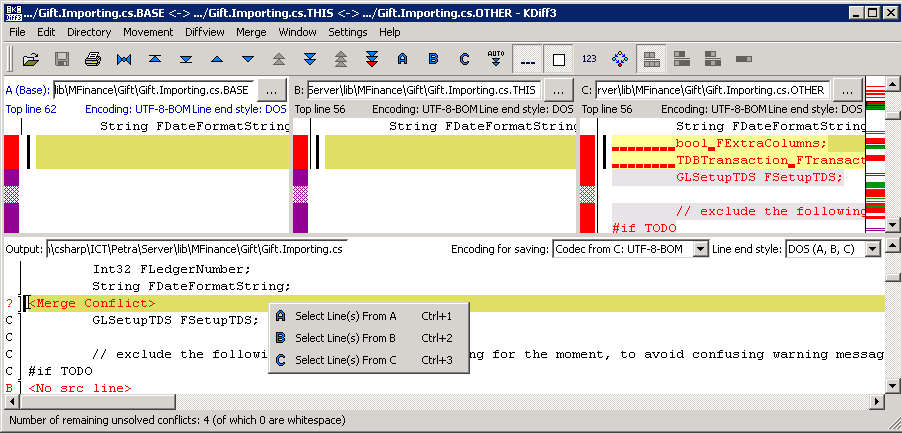
In KDiff3, you have 3 columns:
- The left column (A) is the BASE version. This is the version before all changes happened, the common source of the branches.
- The center column (B) is the THIS version. This is the version that you have last had in your branch.
- The right column (C) is the OTHER version. This is the version coming from trunk, in our example.
- The file at the bottom is the resulting file. You can go through the conflicts, and select if you want to select the version from A, B, or C, or you can modify it yourself.
You might also want to right click the conflicting file in the Explorer, and select the Log, this will you to see what happened to the file, and how the changes got into that file, by looking at the diff of each commit.
After you have fixed the bottom file, saved it and closed KDiff3, select "Mark as resolved" in the conflicts list window, when right-clicking the conflict file.
Frequently asked questions
bzr: ERROR: Could not acquire lock (remote lock)
This can happen when cancelling during a commit, and probably in other situations too. You will get the error the next time your are attempting to commit.
Solution: open the command line console (eg. cmd.exe), and change into the directory of your branch, and run:
bzr break-lock
